All about mail settings
Overview
The following shows you how to access your DreamHost email account on your iPhone (using iOS 11):
Adding a mail account to an iPhone
To quickly find your email settings in the panel, open the Manage Email page and look for the  link in the upper right. Click the text to open the quick-access instructions for your email address:
- Incoming
- imap.dreamhost.com
- pop.dreamhost.com
- Outgoing
- smtp.dreamhost.com
- Tap the Settings
 badge on the home screen of your iPhone.
- The Settings page opens:
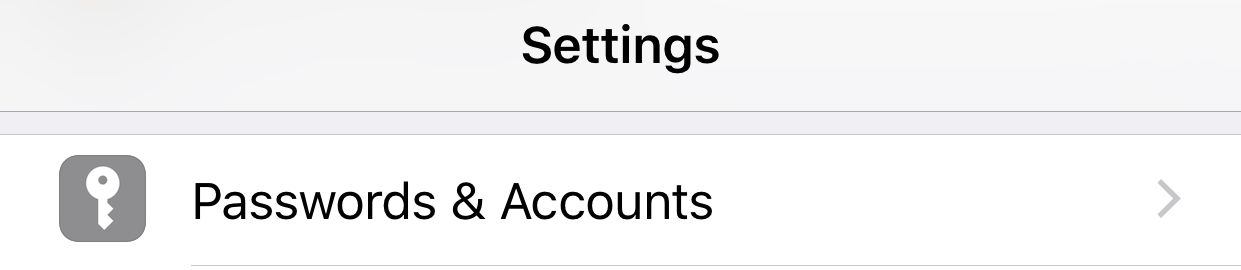
- Scroll down until you see the ‘Passwords & Accounts’ setting.
- Tap Passwords & Accounts.
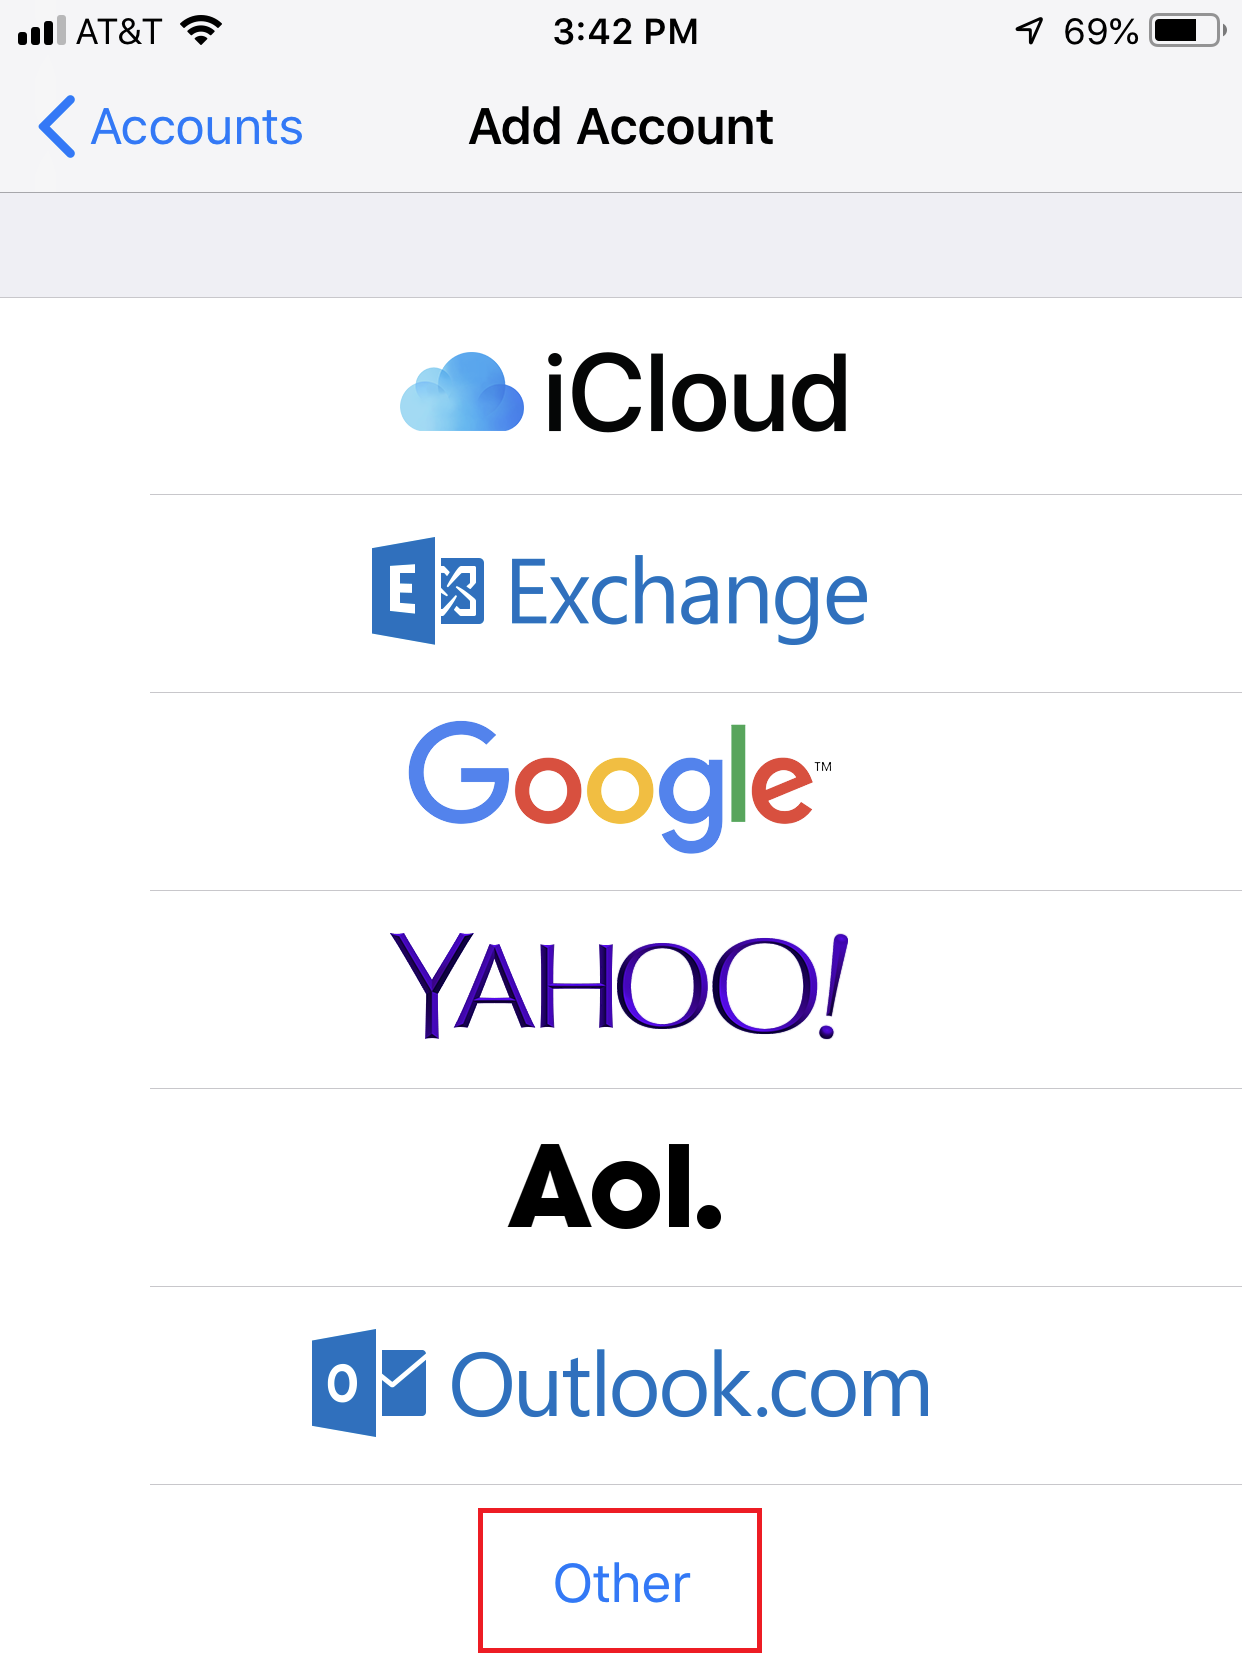
- Tap Add Account.
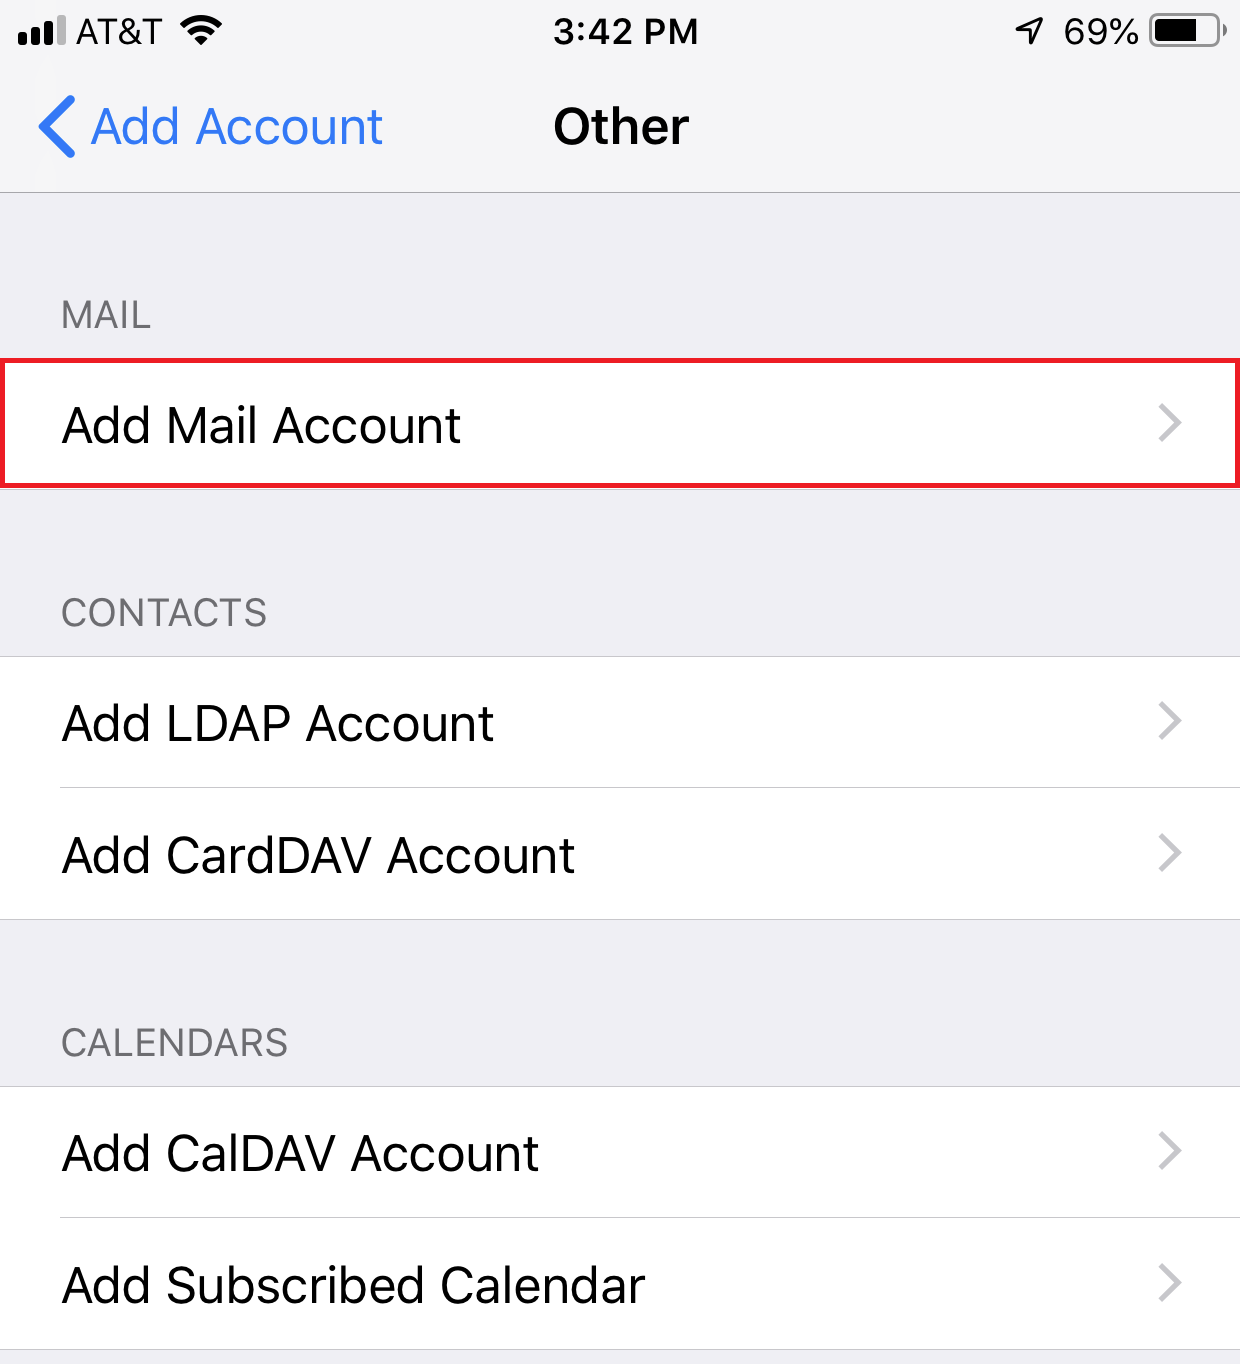
- Tap Other.
- Tap Add Mail Account.
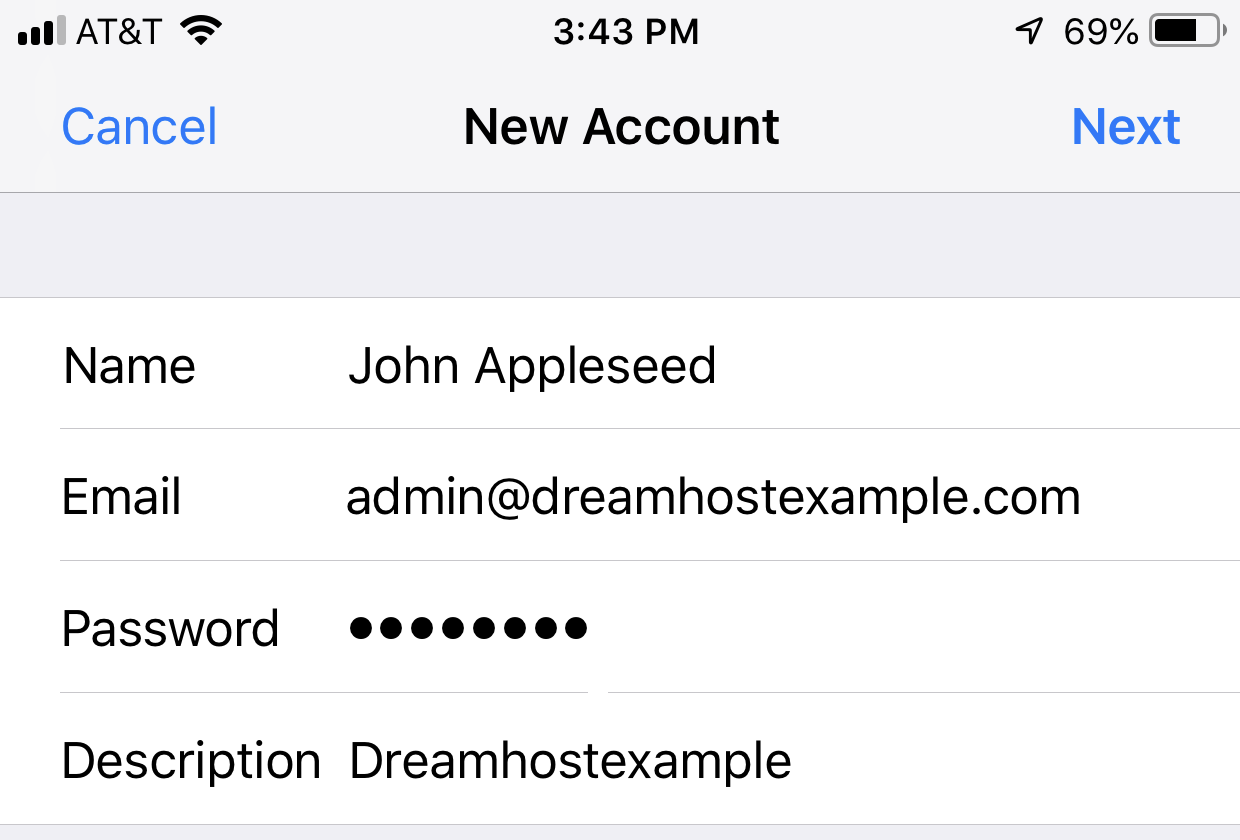
- The New Account page opens:
- Enter the following information for the email account:
- Name — Your name, which displays on the receiving end.
- Email — Your email address, which is where replies are sent to and should likely be the same as your username.
- Password — Your password.
- Description — Description of this account. This appears as the name of your address on the ‘Settings’ page of your phone.
- When finished entering your new account details, tap Next in the upper right corner.
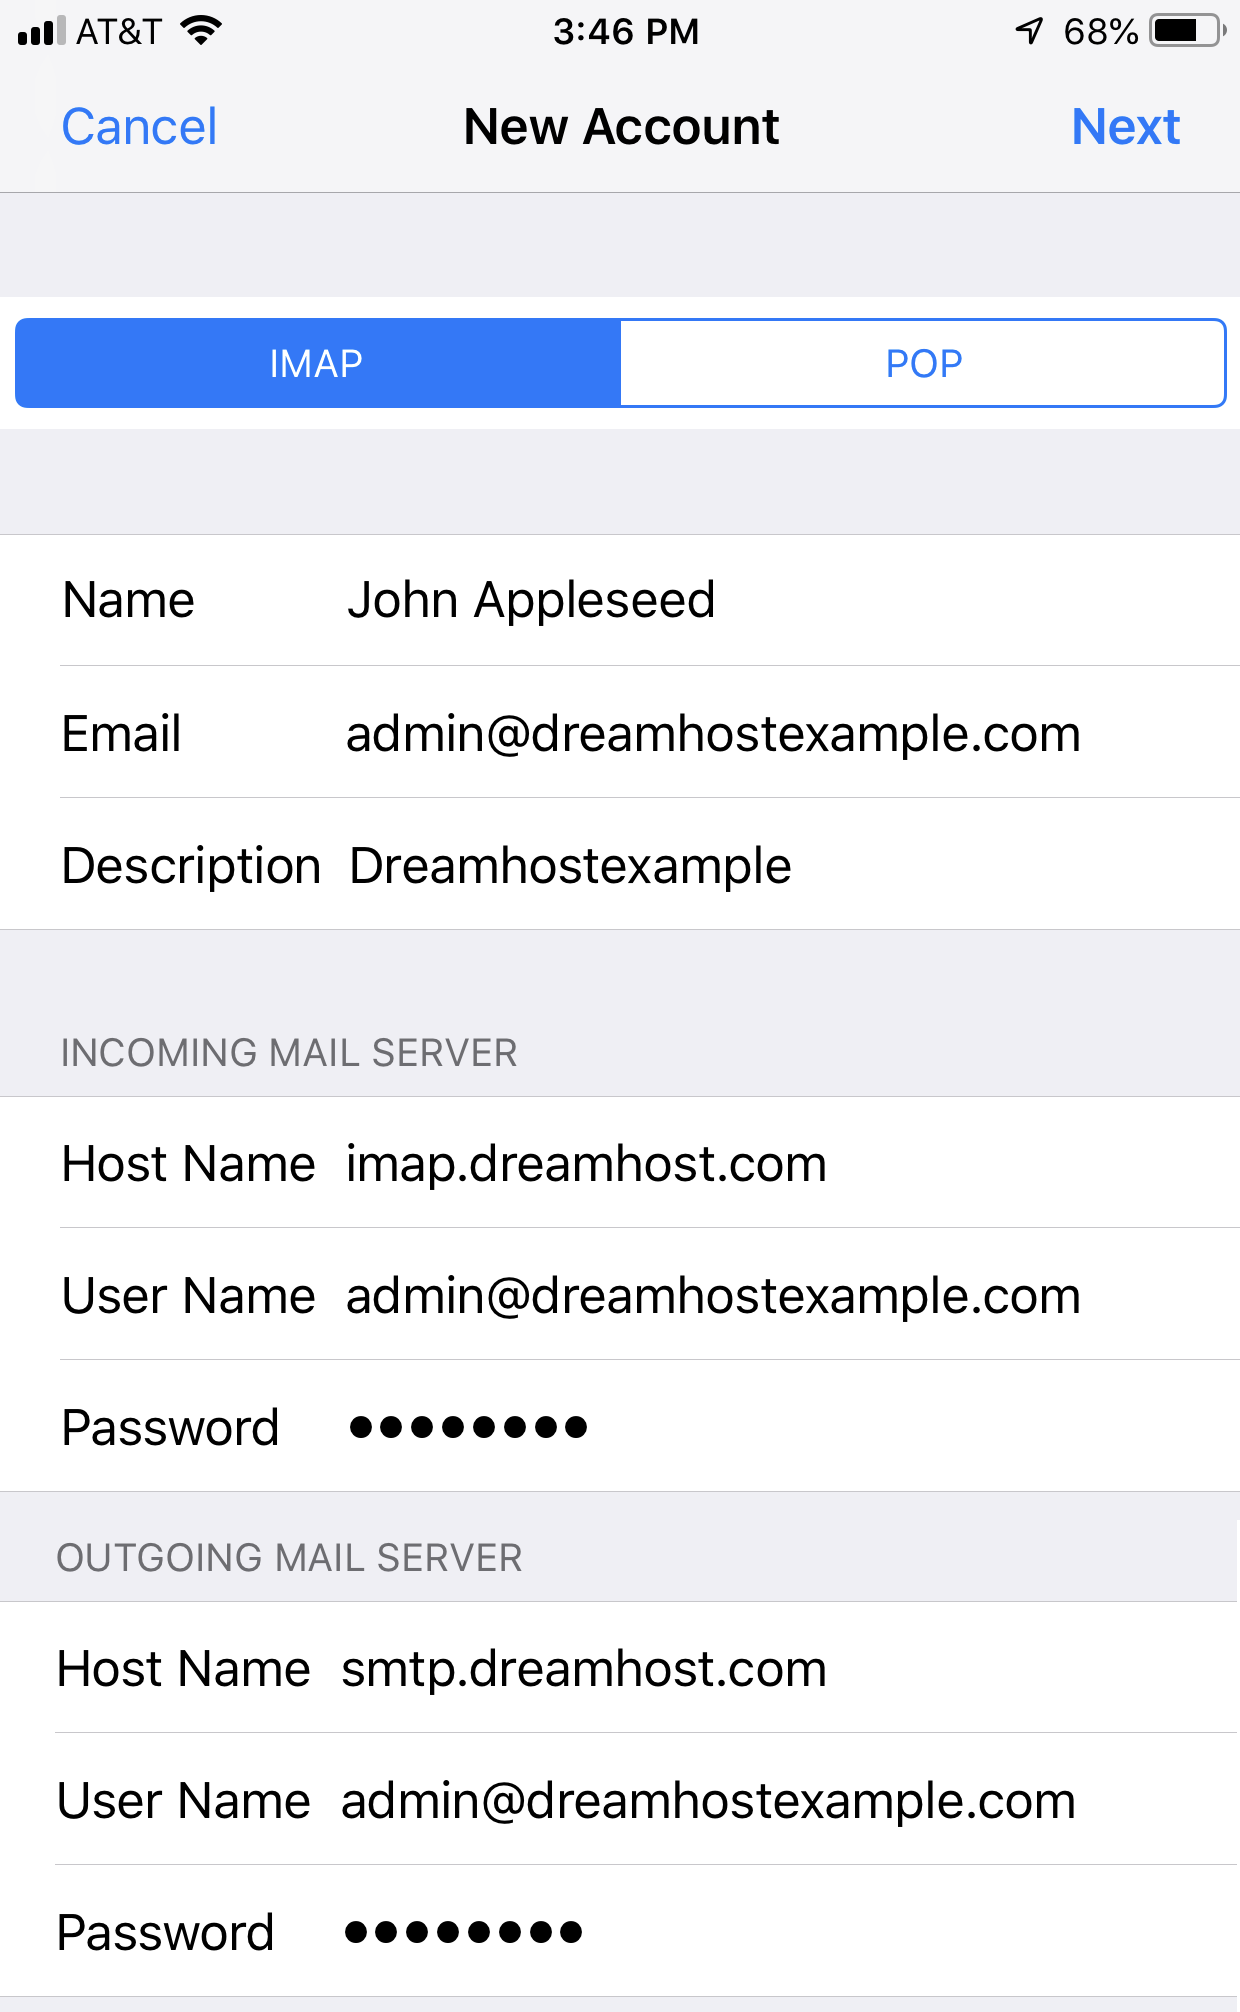
- The MAIL SERVER settings page opens:
- Make sure ‘IMAP’ is highlighted, and then enter the following information for the INCOMING and OUTGOING MAIL SERVER:
- INCOMING MAIL SERVER
- Host Name — This is either imap.dreamhost.com or pop.dreamhost.com.
- Username — address@example.com (the email address you’re accessing.)
- Password — Password for the email address. If you don’t know what this is, you can request/reset it from the Manage Email section of your panel by clicking the Edit button next to the address.
- OUTGOING MAIL SERVER
- Host Name — This is smtp.dreamhost.com.
- Username — address@example.com (the email address you’re accessing).
- Password — Password for the email address. If you don’t know what this is, you can request/reset it from the Manage Email section of your panel by clicking the Edit button next to the address.
- When finished entering the new mail server details, tap Next in the upper right corner.
- The DreamHost mail server is contacted and verifies your email account:
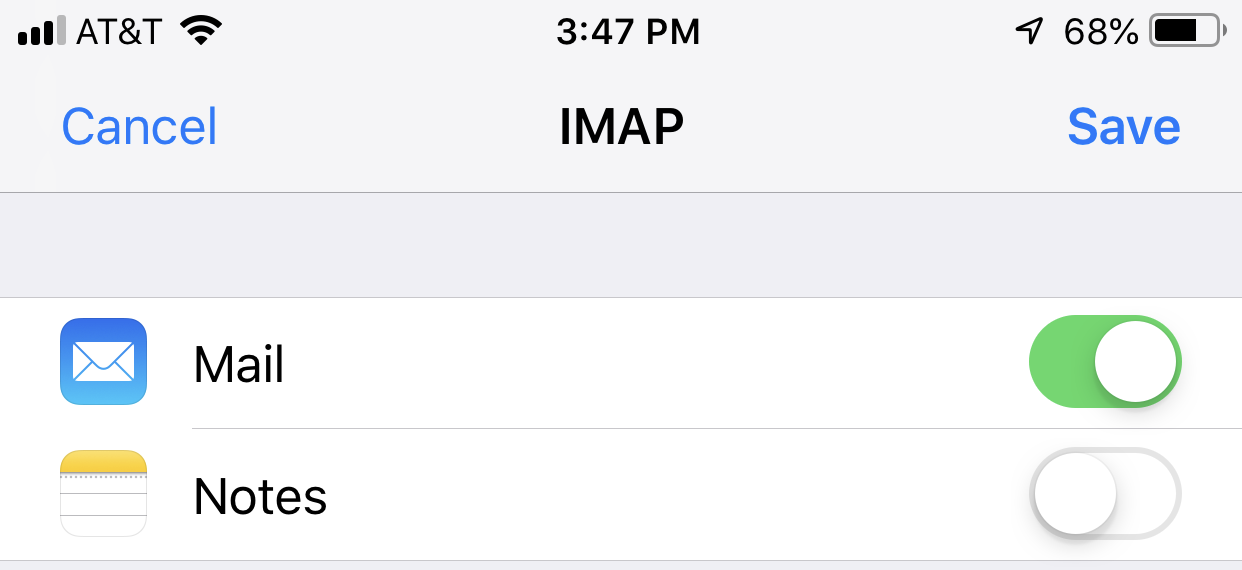
- When the email account is successfully verified, the following page appears allowing you to save your new mail account:
- Tap Save in the upper right corner to finish setting up your new mail account.


Secure settings
Secure settings are enabled by default when you create the mail account. This means your port numbers are set to secure ports that use SSL when connecting to the mail server.
You can view your settings by following these steps:
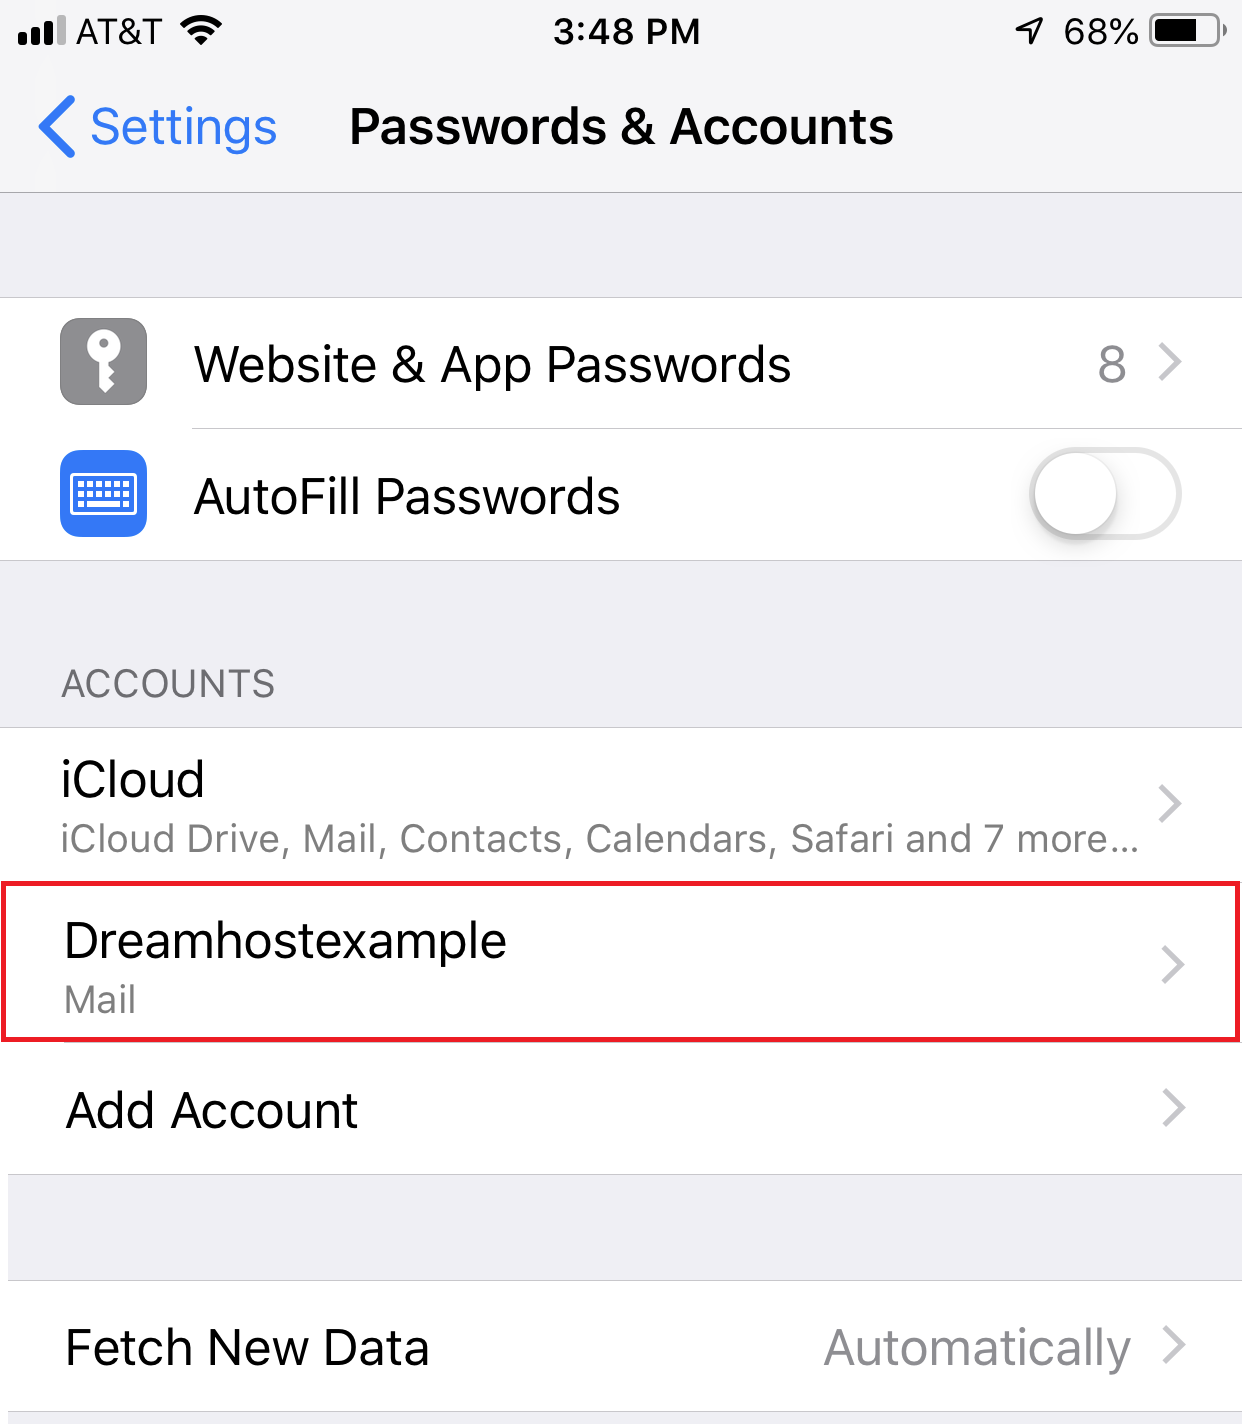
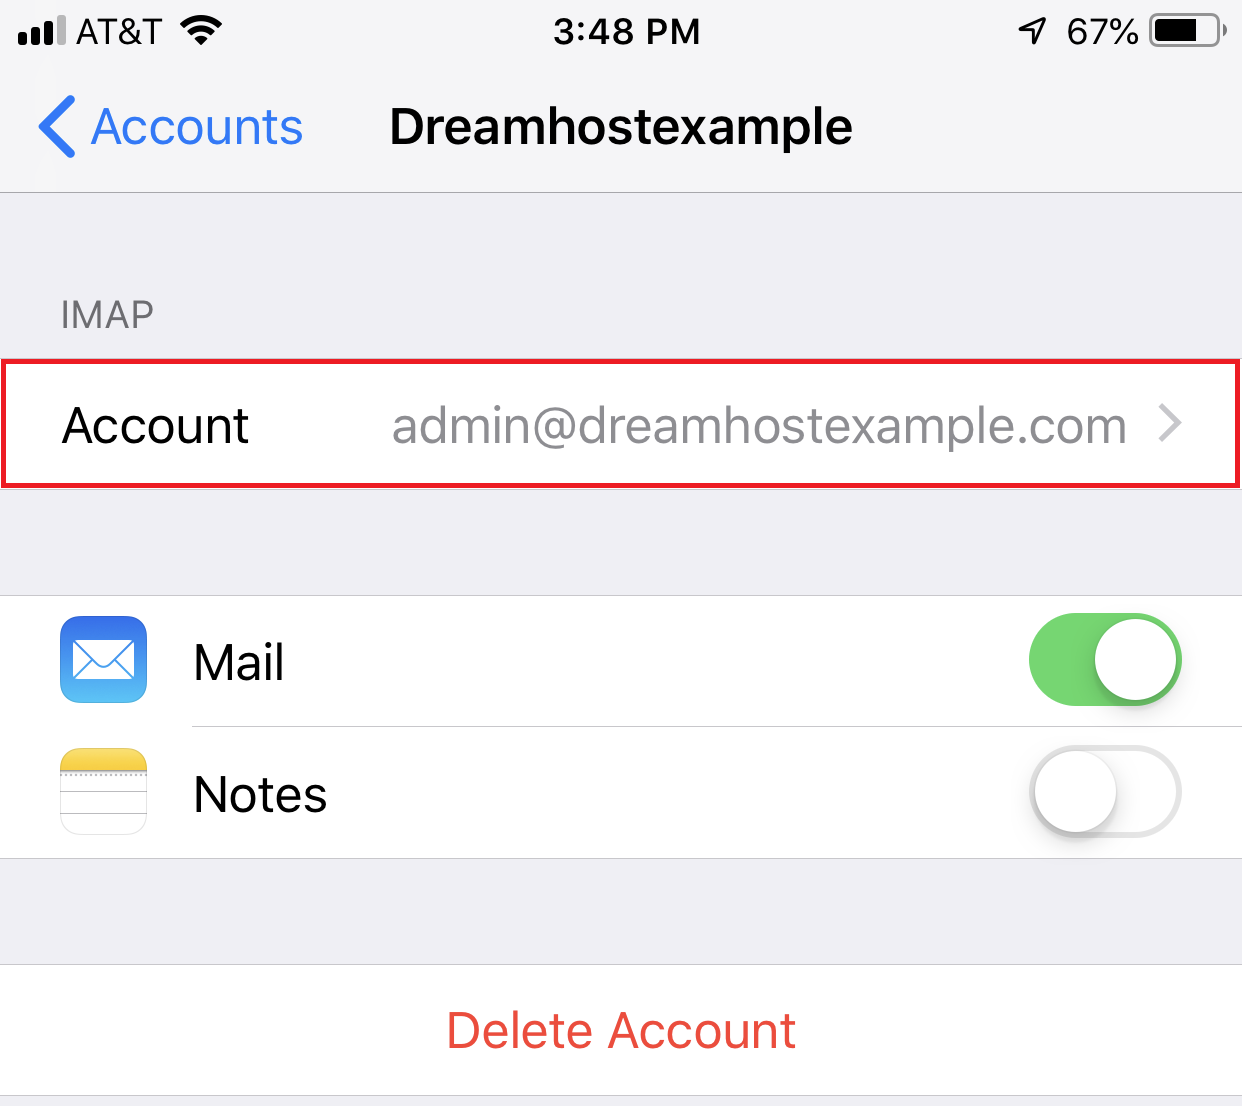
- Navigate to (Settings > Passwords & Accounts).
- Tap a DreamHost email account.
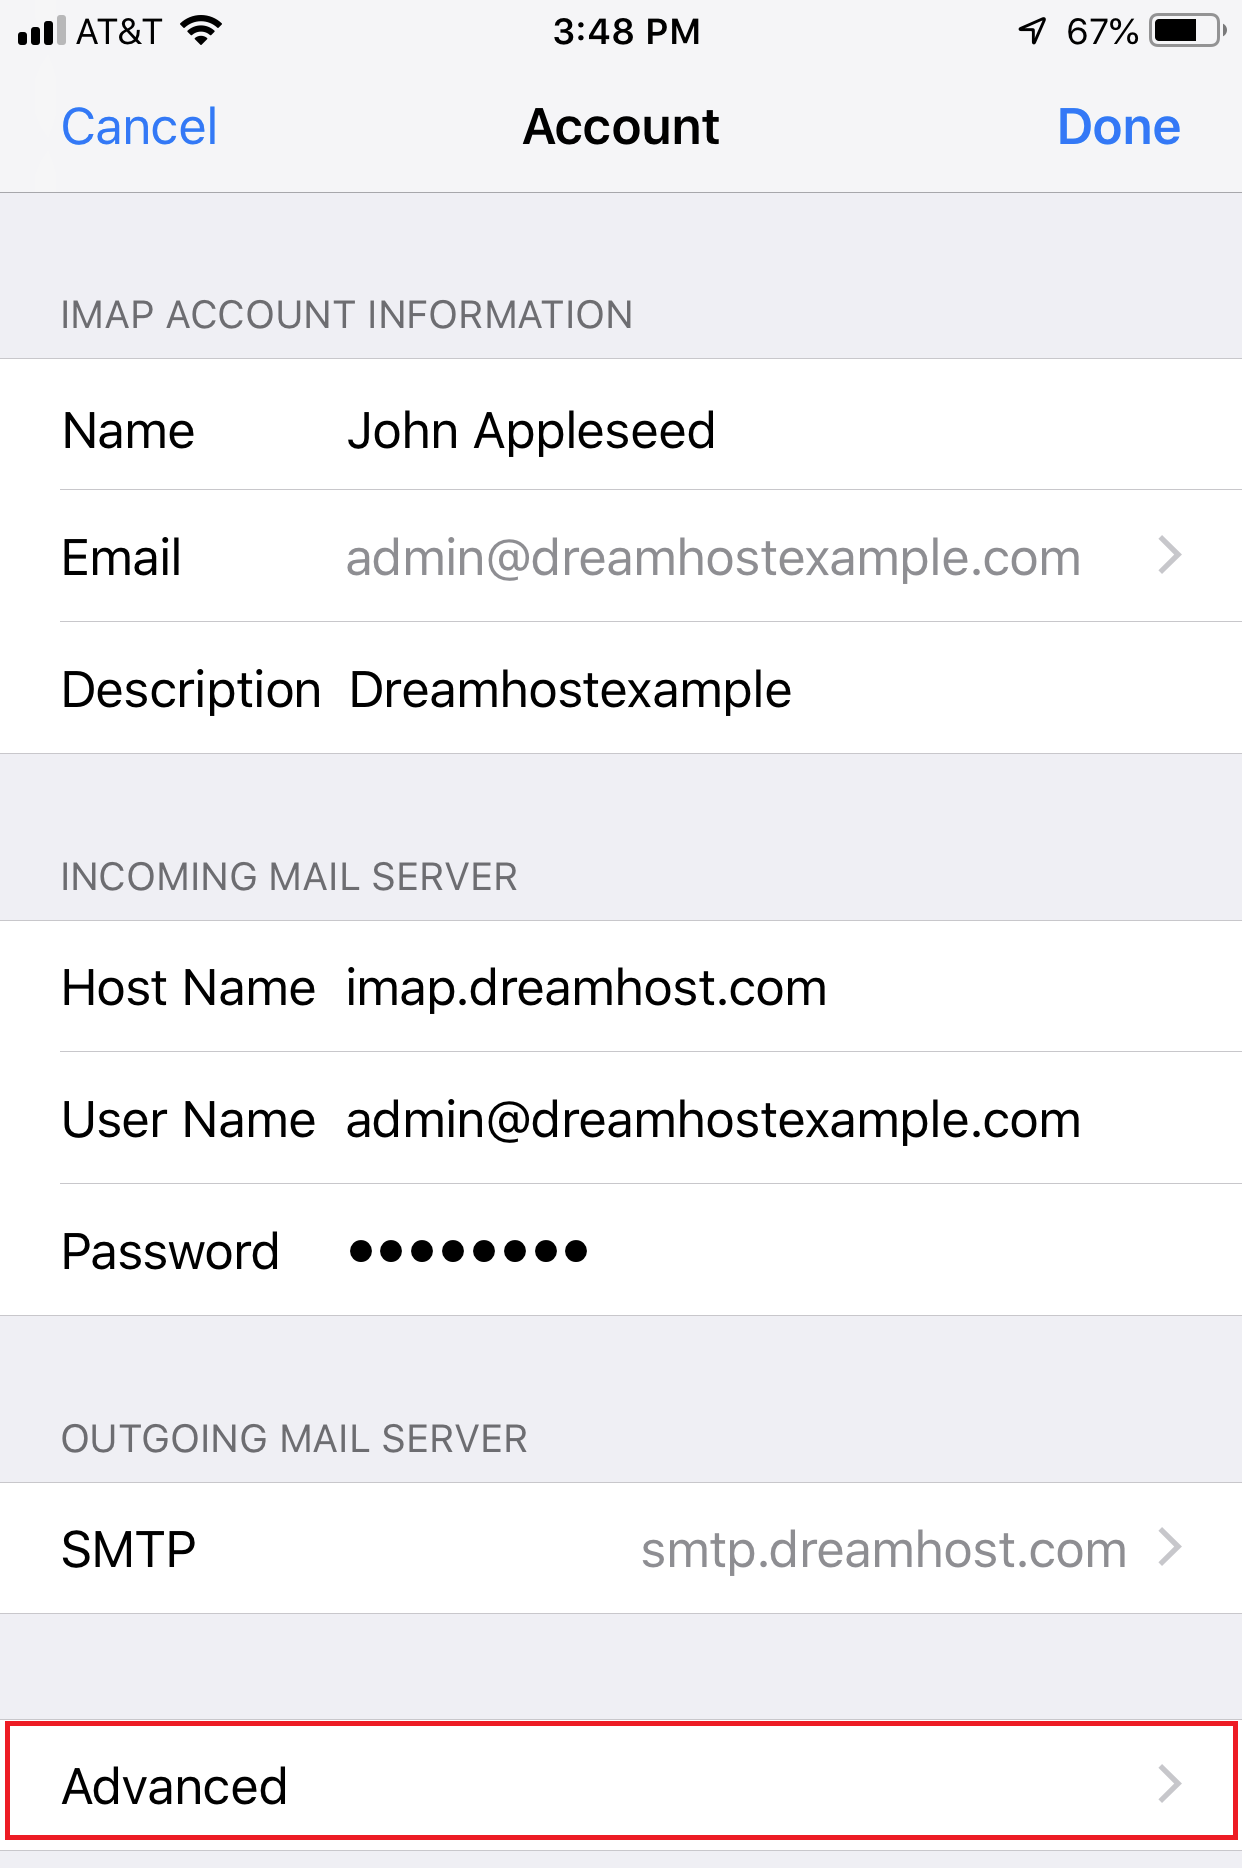
- Tap ‘Account’ to view the basic settings.
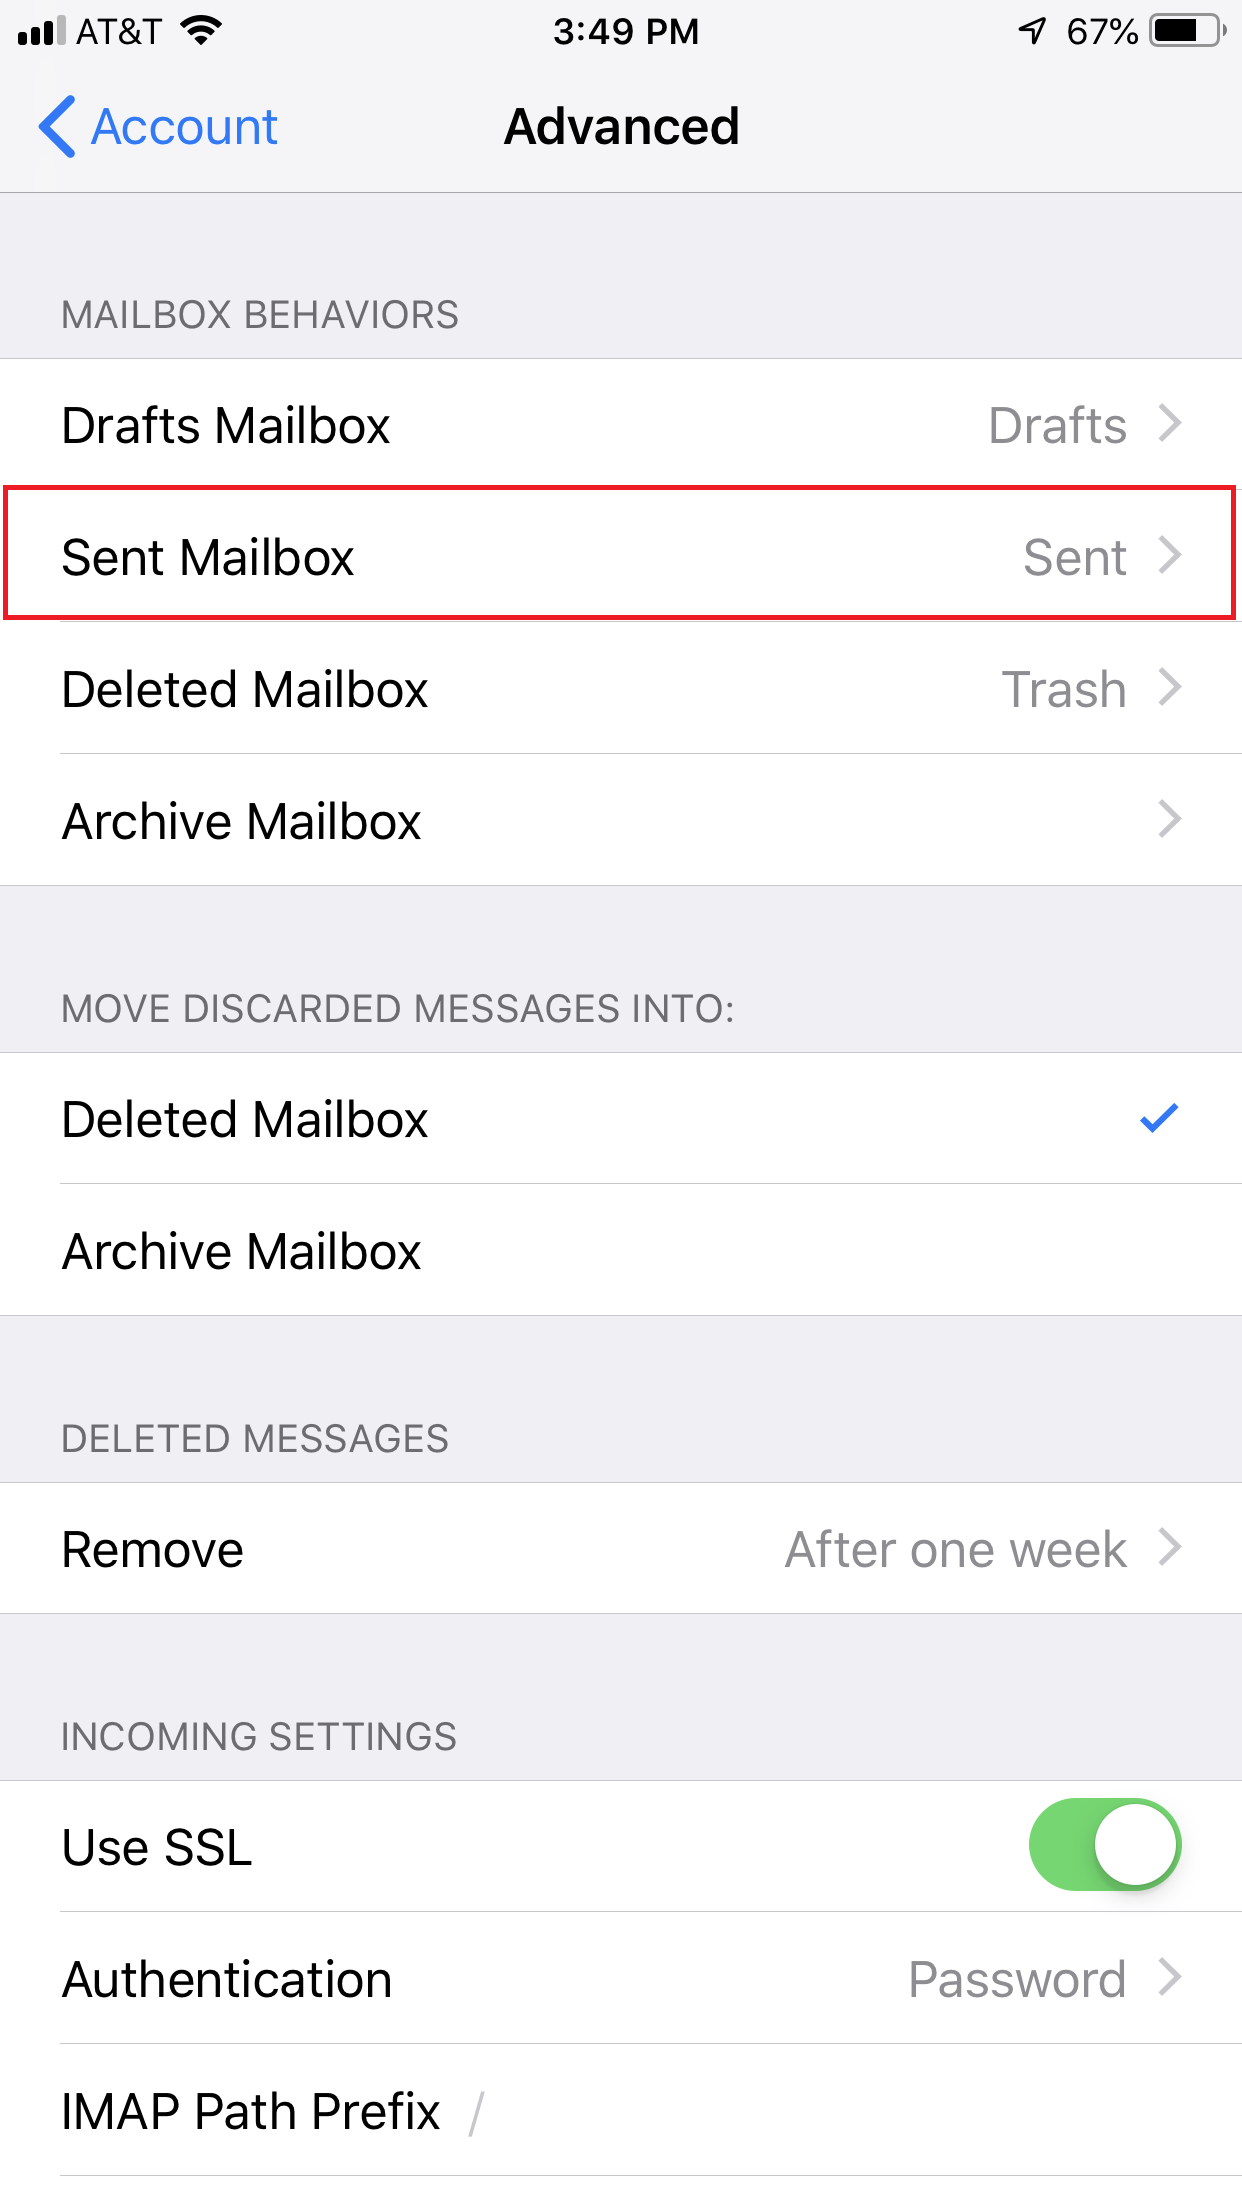
- To view your secure settings, tap ‘Advanced’ towards the bottom.
- Scroll down to view all settings.
It’s not recommended you change these value as they should already be set to use secure settings.
Mailbox Behaviors
Depending on your iPhone iOS version and configuration, you may need to adjust the ‘Mailbox Behavior’ settings to ensure that your email appears in the designated folder on the DreamHost mail server. This includes the following folders:
- Drafts
- Sent
- Deleted
- Archive
The following example describes how to change the configuration for ‘Sent’ email to appear on the DreamHost mail server (instead of on your iPhone):
- Navigate to (Settings > Passwords & Accounts).
- Tap a DreamHost email account.
- Tap ‘Account’ to view the basic settings.
- Tap ‘Advanced’ towards the bottom.
- Tap ‘Sent Mailbox’.
- Tap ‘Sent Messages’ under the ON THE SERVER section.
- When finished, tap ‘Advanced > Account > Done’ at the top.
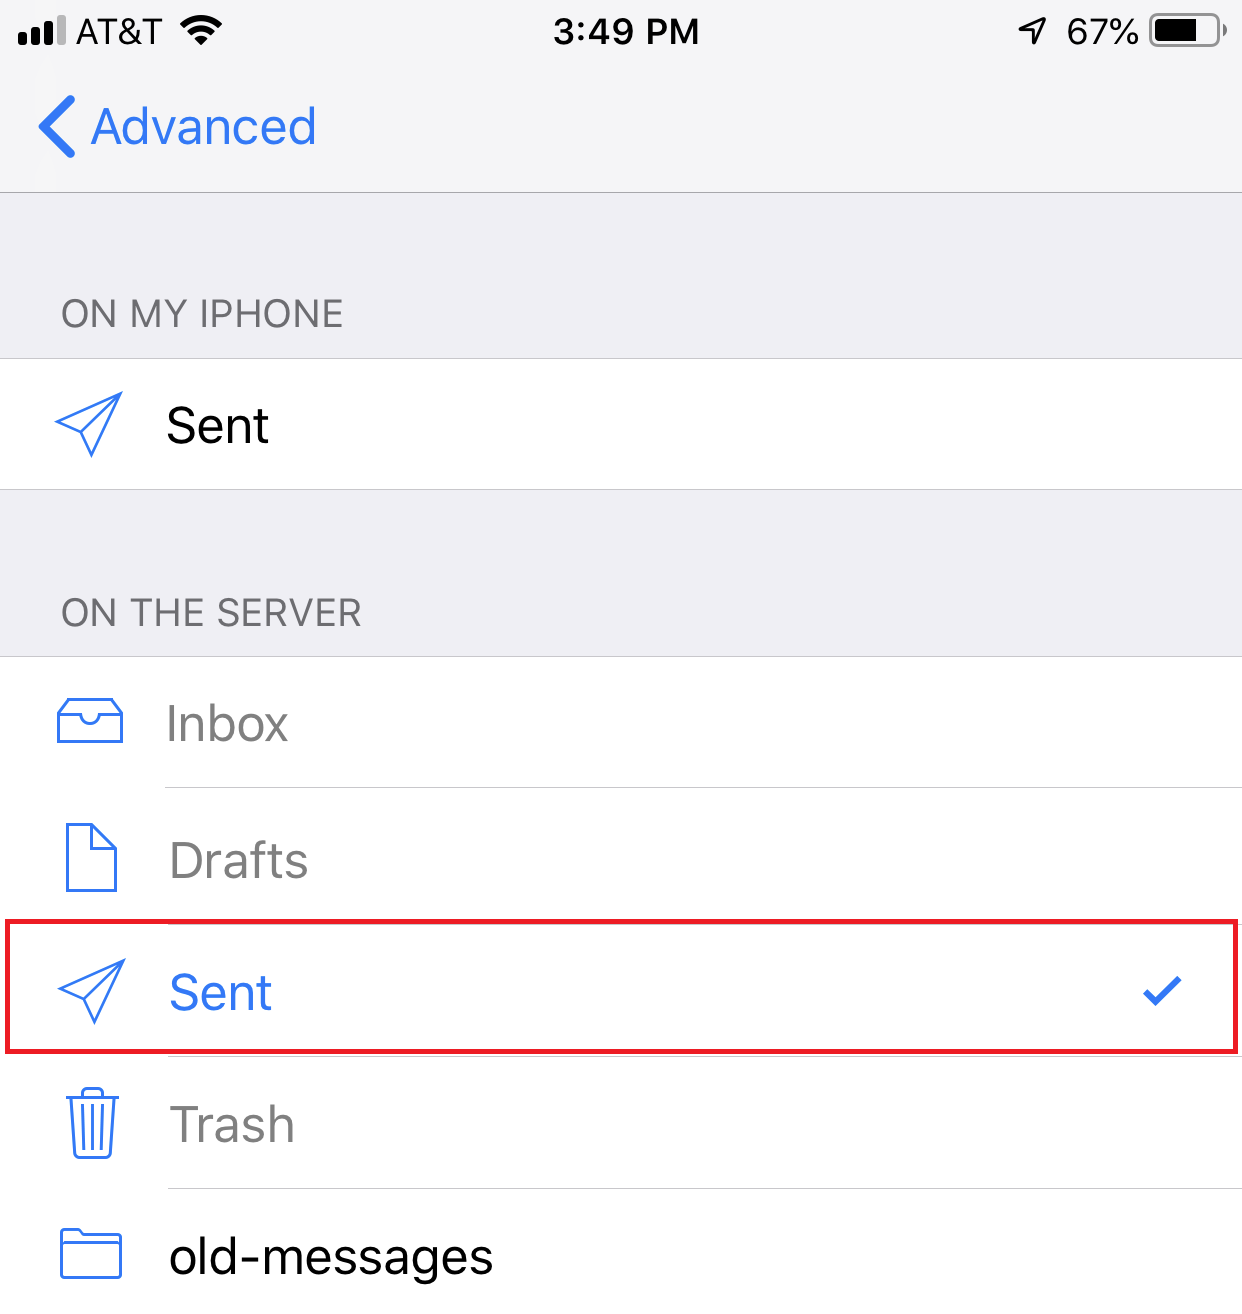
Your sent messages now appear on the mail server instead of on your iPhone folder.
Push and Fetch settings
‘Push’ is not available with a DreamHost email account. You must use ‘Fetch’ or ‘Manual’. View the following article for further details:
Troubleshooting
I’ve added a DreamHost mail account to my iPhone, but it won’t connect
The iPhone automatically detects the rest of the settings and connects to your mailbox. However, in some cases, it may not properly connect the first few times. You may need to tap the Connect button several times before it connects properly. This is a known issue within the mail program on the iPhone that can cause this behavior.
You can make the following changes in the Advanced section if you are experiencing any sync issues:
- You must set the IMAP Path Prefix to INBOX (all caps) for IMAP clients to work properly with DreamHost servers. Most desktop email clients work normally but instead show all the folders under the Inbox as sub folders rather than alongside it.
- For sent messages, tap ‘Sent Mailbox’ under the ‘MAILBOX BEHAVIORS’ section, and then tap the folder you wish to use for sent messages (in the ‘ON THE SERVER’ section). The current choice has a paper airplane next to it.
The ‘Cannot Verify Server Identity’ message appears
If you enter any other hostname other than imap.dreamhost.com, the following message appears after you connect:
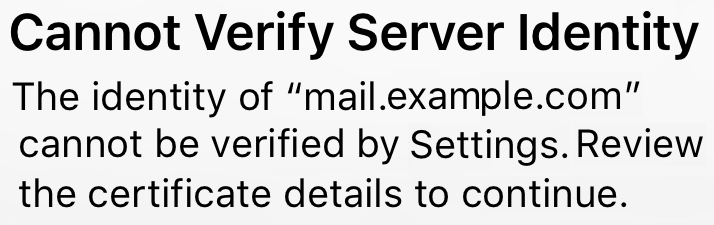
Review the steps above to ensure the hostname you’ve entered to connect is imap.dreamhost.com. This will resolve the error.
Where can I find more information?
If you are having trouble and suspect that you may have set something incorrectly, please refer to the Email Client Configuration article or contact DreamHost support.
How can I manually choose POP3 or IMAP on my iPhone?
Recent versions of the iOS mail client attempt to auto-detect whether the server supports POP3 or IMAP and select either accordingly. To make the choice manually, enter an incorrect email address into the ‘Settings’ page on your iPhone, e.g., [a bogus email address]@[your domain]. The settings will then not auto-detect, and you can select which protocol you wish to use. Don’t forget to fix your email address to [your correct email address]@[your domain].
Overview

The following describes how to add an email account on a Samsung Galaxy S5 using the Android stock Gmail app.
For a list of acceptable server settings, view the following articles:
For a list of alternate mail apps, view the ‘See also’ section at the bottom of this page. However, the settings are generally the same for any app you choose.
Configuring your email
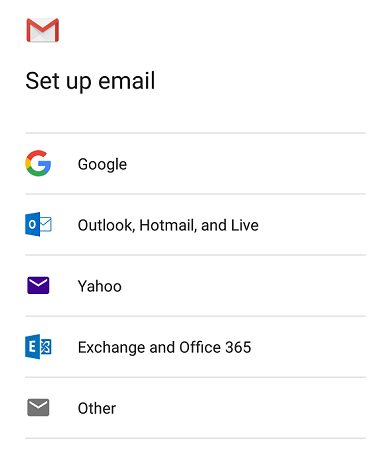
- Open the mail app.
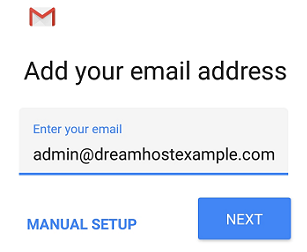
- Select the ‘Other’ option.
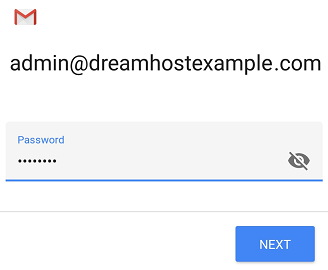
- Enter the email address you wish to connect to. In this example, the email is admin@dreamhostexample.com.
- Click the MANUAL SETUP button.
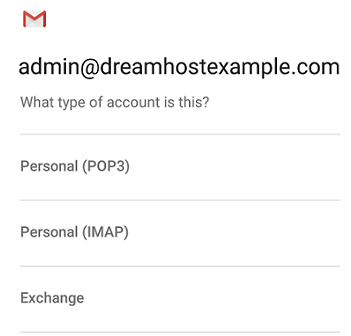
- Choose which type of account you’d like to use. IMAP is recommended.
- Enter your password.
- The Incoming server settings screen opens:
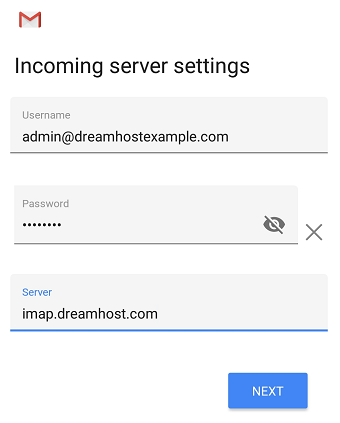
- Enter the following ‘Incoming’ server settings:
- Username – Your full email address
- Password – The password of your email address
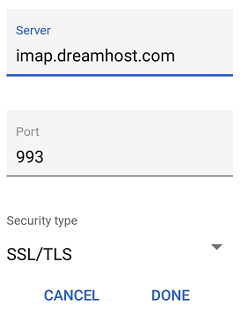
- SERVER – View the Email server name article to ensure you’re using your correct mail server name. This should be either imap.dreamhost.com or pop.dreamhost.com.
- Click the NEXT button.
- The Outgoing server settings screen opens:
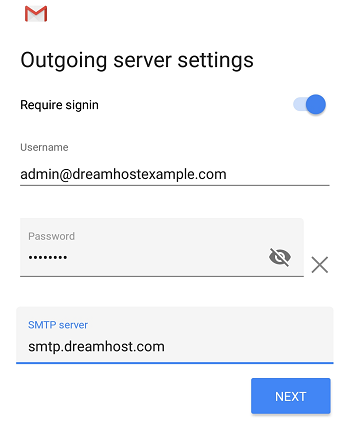
- Enter the following ‘Outgoing’ server settings:
- USERNAME – Your full email address
- AUTHENTICATION – Your password
- SMTP SERVER – This should always be smtp.dreamhost.com.
- Click the NEXT button.
- The Account options screen opens:
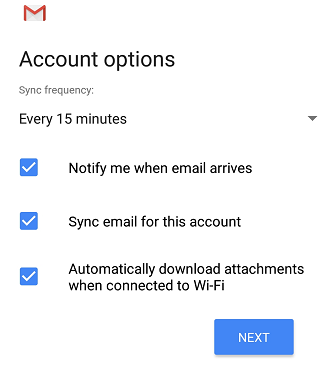
- Select your desired settings.
- Click the NEXT button.
- A screen opens confirming your address is properly configured:
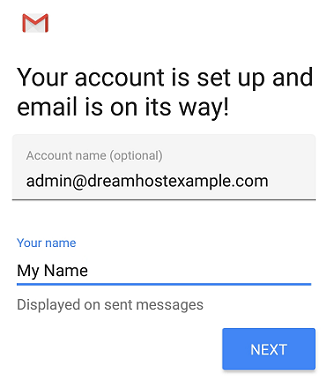
- Fill in the following two options:
- Give this account a name (Optional) – Just leave this as your address
- Your name (Displayed on outgoing messages) – You can change this to your actual name if you like
- Click the NEXT button to complete the configuration.
Verifying and adjusting secure settings
By default, the GMAIL app configures security for your email connection. You can confirm or change these settings within the app.
- Load your email.
- On the top left, click the three horizontal lines next to INBOX.
- Scroll down and click the ‘Settings’ link.
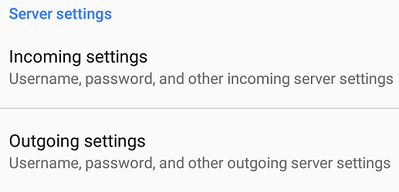
- Scroll down and you’ll see ‘Incoming’ and ‘Outgoing’ settings. Click either to view.
- Incoming
- Outgoing

Overview
This article walks you through the steps for setting up the following versions:
- Mail 11.2 on OS X El Capitan
- Mail 11.2 on macOS Sierra (10.12)
- Mail 11.5 on macOS High Sierra (10.13.6).
Step 1 — Verifying the email user exists in your web panel
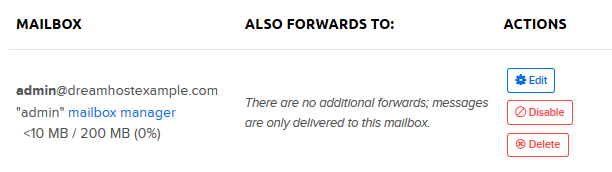
Make sure your email user is already set up in the DreamHost panel by going to Manage Email.
- You will see your mail user listed on the page:
Step 2 — Finding your email server
In the past, it was possible to use mail.example.com to connect (where example.com is your actual domain name). Due to how modern mail clients handle security, this is now NOT recommended as it may throw connection errors. Please ensure you are only using your mail server name when connecting.
It will be one of the following depending on if you’re connecting using IMAP or POP:
IMAP hostname: imap.dreamhost.com
POP hostname: pop.dreamhost.com
When you set up the first email address under a domain (that is configured to be hosted with DreamHost), the DreamHost system automatically creates the necessary hostnames and MX records that are required to process email for that domain. Please also note that if this is your first address on a domain, it may take up to 6hrs for those emails to function.
Step 3 — Setting up a new account in Mail
- Open the Apple Mail application by clicking the Mail icon on the bottom dock. You can also click the magnifying glass on the top right and type the word ‘Mail’ into the search bar.
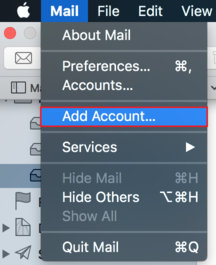
- If you need to add an additional account, click ‘Mail > Add Account…’.
- The mail app opens and asks you to select an account provider.
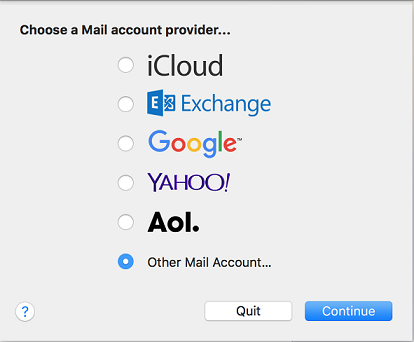
- The ‘Choose a mail account provider…’ page opens:
- Select the Other Mail Account… option and click the Continue button.
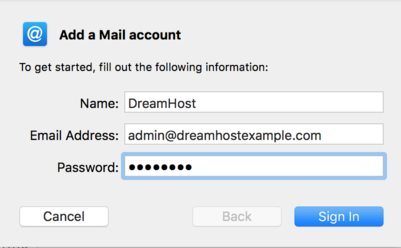
- This example uses the email address “admin@dreamhostexample.com”:
- Enter the following:
- Name: This is how you’d like your name displayed when sending email.
- Email Address: This field must contain the full email address.
- Password: This is the password you set up for the email when creating it in your panel.
- Click the Sign In button when finished.
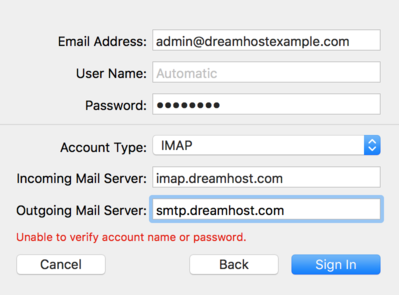
- You should receive notification reading the name or password cannot be identified. This is normal due to DreamHost’s mail server configuration.
- To fix the error, make sure the following three fields are configured:
- Account Type: Choose IMAP or POP
- Incoming Mail Server: Your mail server name. This is either imap.dreamhost.com or pop.dreamhost.com.
- Outgoing Mail Server: This is smtp.dreamhost.com.

In this example, IMAP is used as the connection as this is the preferred protocol. But, if you wish you can also use POP to connect.
- Click the Sign In button to proceed.
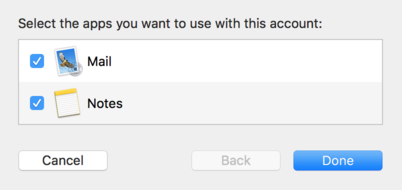
- Choose which apps you’d like to associate with this account and click Done.
Your new email address is now set up and ready to use. You can send a test message to confirm it’s working properly.
To quickly find your email settings in the panel, open the Manage Email page and look for the link in the upper right. Click the text to open the quick-access instructions for your email address:
- Incoming
- imap.dreamhost.com
- pop.dreamhost.com
- Outgoing
- smtp.dreamhost.com
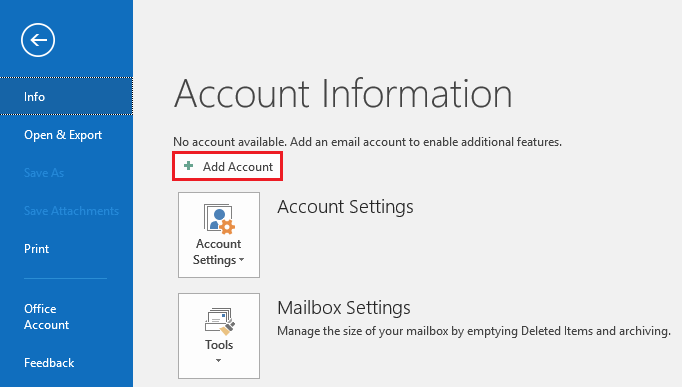
To add an email account to Outlook 2016 or 2019 on Windows:
- Open Outlook 2016 or 2019 from your start menu.
- On the top left, click the ‘File’ tab.
- A popout menu appears allowing you to add an account:
- Click ‘Add Account‘.
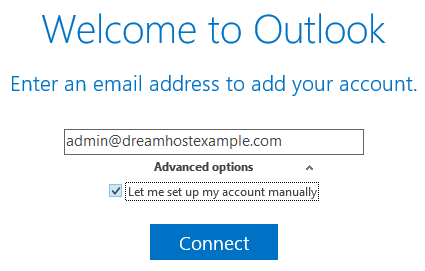
- Enter your email address.
- Click the ‘Advanced’ link and check the box to set up the account manually.
- Click the ‘Connect‘ button.
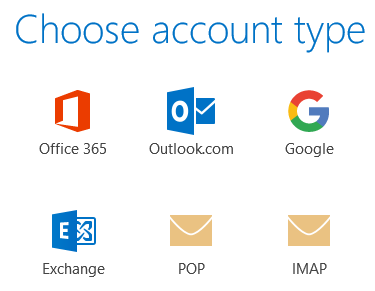
- Choose POP or IMAP. IMAP is recommended.
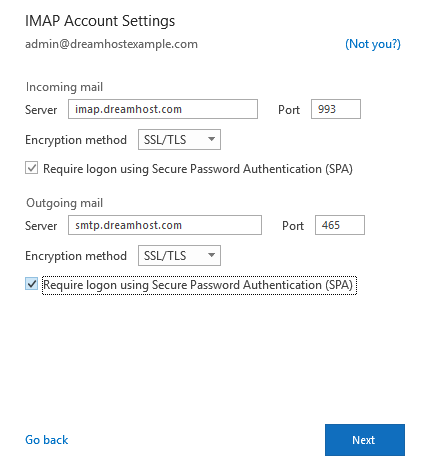
- On the next page, you’ll need to enter your Incoming and Outgoing settings.
- Server — This is your DreamHost mail server name. The example above uses ‘imap.dreamhost.com’ for the incoming server. If you’d prefer a POP connection, you would use pop.dreamhost.com instead. The outgoing server is always ‘smtp.dreamhost.com’.
Make sure you only enter your DreamHost mail servername. Do not use a subdomain such as mail.example.com. You may get an insecure warning if you use the wrong mail hostname.
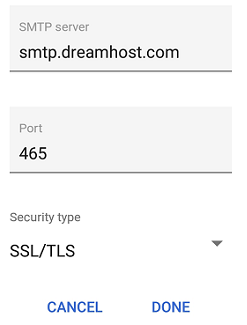
- Port — If you chose IMAP, the secure port is 993. For outgoing ports, use 465 or 587.
- Encryption — SSL/TLS.
- Require logon using Secure Password Authentication — Check this box.
- Server — This is your DreamHost mail server name. The example above uses ‘imap.dreamhost.com’ for the incoming server. If you’d prefer a POP connection, you would use pop.dreamhost.com instead. The outgoing server is always ‘smtp.dreamhost.com’.
- Click the ‘Next‘ button.
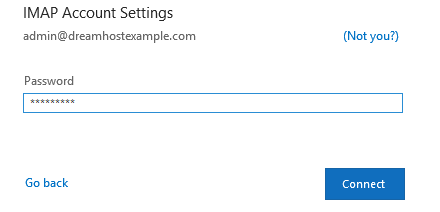
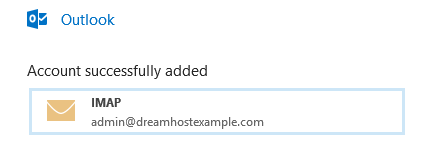
- Enter your password and click ‘Connect‘.
- You will see a confirmation if it was successfully set up.

Overview
Mozilla Thunderbird is an open source mail client and RSS reader made by the organization who produces the Mozilla Firefox web browser. This is a free email client you can use with DreamHost. It can also be used as a backup client for testing purposes if you find your primary client is not functioning as it should.
For an overview on the different settings and protocols you can use to connect Thunderbird to your email, please review the following article:
Setting up Thunderbird
- Open Thunderbird.
- From the File menu, select New and then Existing Account.
- The Mail Account Setup page appears:
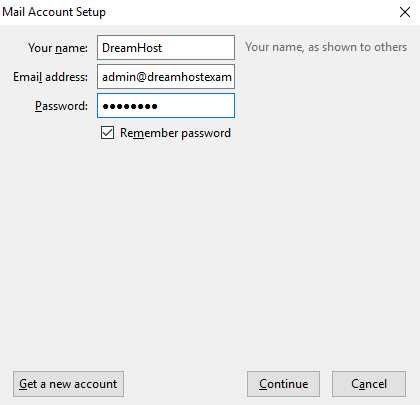
- Enter the following settings:
- Your name: Enter the name of the user you’re setting up. This shows in the message ‘From’ details.
- Email address: Enter the full email address for your user here.
- Password: Enter the user’s password here. (The password is case-sensitive so make sure you enter the password exactly as it was created.)
- Remember password: You can check this box for so that the program doesn’t prompt you to enter the password each time you open it up.
- Once you enter the information above, click Continue on the bottom right.
- The following settings appear.
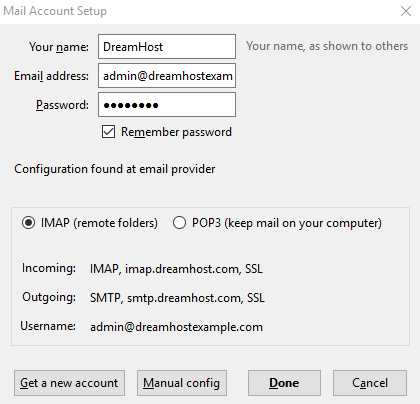
- The correct settings for your mail server should appear. Check the ‘Mail server names‘ article to confirm. The incoming server should be either imap.dreamhost.com or pop.dreamhost.com. The outgoing server is always smtp.dreamhost.com.
Thunderbird should automatically configure secure ports during this setup. However, if Thunderbird does ask you for port information, you can use the following article to determine you port numbers:
- Click Done to complete the setup.

Secure settings
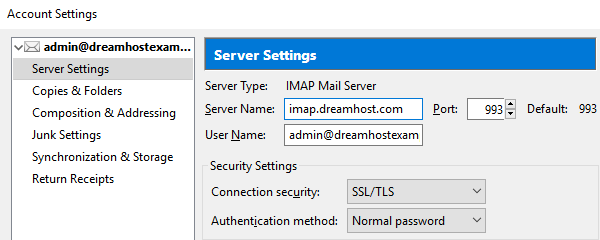
Thunderbird automatically configures your address to use secure settings. This means port 993 IMAP and 465 for the outgoing server.
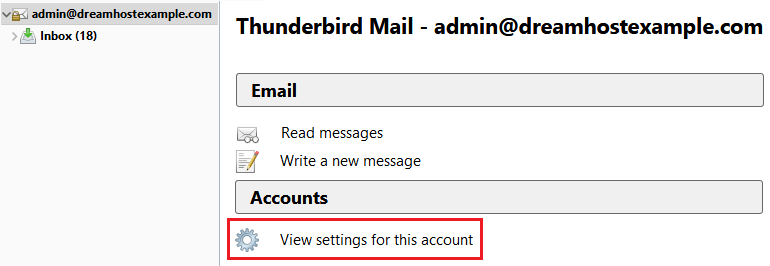
- To confirm these settings, click your email in the left pane.
- In the center pane click ‘View settings for this account’.
- A pop-up displays. In the left pane click ‘Server Settings’ under your address to view the port#, SSL option, and Authentication method.
- Click ‘Outgoing Server Settings’ in the left pane to view those settings.
Viewing message headers
The Thunderbird mail program refers to the full message headers of a message as the “source”. In some cases, you may need to retrieve the full header (or “source”) details of a message.
To view the full header details of a message:
- Click the message to view its content.
- In the far right corner of the message, click the ‘More’ dropdown.
- In the drop-down options, select ‘View Source’.
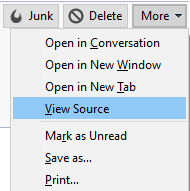
This opens a new window with the full header details of the message you choose.
Troubleshooting
Some of my IMAP folders don’t show on Thunderbird. How do I fix this?
Make sure that you have subscribed to them!
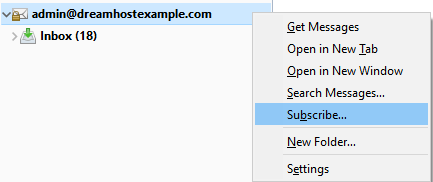
- In the left pane, right click your email address:
- In the pop-out menu and choose ‘Subscribe’.
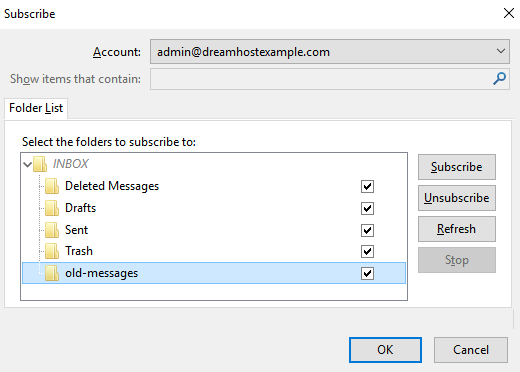
- The Subscribe box opens which shows you the default folders to which you are already subscribed.
- Check the box for the folder you wish to subscribe to, then click the Subscribe button to add that folder as an accessible folder through Thunderbird.
- Click OK when finished.
Alternatively, you can also do the following to make your IMAP folders appear in Thunderbird:
- Go to (Tools > Account Settings… > Server Settings) then click the Advanced button.
- Uncheck “Show only subscribed folders”.
- Click OK on that pop-up box. Click OK on the ‘Advanced Server Settings’ box you originally opened.
- In the left pane of Thunderbird’s main window, click the triangle icon to the left of the email address. Collapse and un-collapse the account you edited.
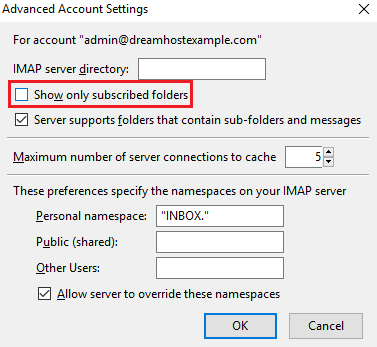
This makes Thunderbird re-read all of the folders on that account.
Overview
After you have added an email address in the DreamHost panel, you can access it using DreamHost’s webmail or an email client such as MacMail, Outlook, or Thunderbird.
After you add the first email address, it could take 4-6 hours for the DNS to update online. Only after the DNS updates will you be able to access webmail. Any additional addresses you add are immediately available.
This article contains the following contents:
- Basics — Basic questions about DreamHost’s webmail service.
- Using webmail — Composing emails and managing folders
- Spam — Managing Spam emails
- Misc questions — Misc questions about DreamHost’s webmail service.
Basics
Accessing Webmail
Visit the following URL to log into your Webmail service:
https://webmail.dreamhost.com
- The login page opens:
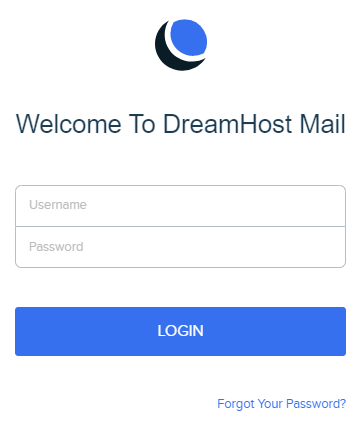
Webmail is automatically configured to connect to the DreamHost mail server. The only credentials you must enter are your email address and password.
Updating your email password
View the following article if you need to update your email password:
Retrieving your password
View the following article for details on how to reset your email password:
Security warning when using HTTPS with your website URL
In the past, it was possible to log into webmail at https://atmail.example.com (where example.com is your website). Due to improvements with DreamHost’s email infrastructure, you should no longer use this URL to connect.
It is highly recommended that you only use https://webmail.dreamhost.com to connect to your webmail account.
Is there a charge for webmail?
No. Webmail is free with any purchased hosting plan or paid email plan.
Using webmail
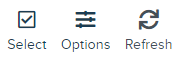
Checking for new mail
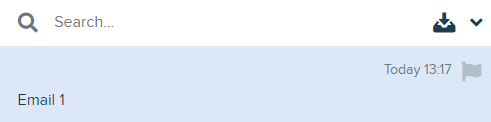
Webmail automatically checks and displays new mail if you leave it open. You can also click the Refresh button to manually check.
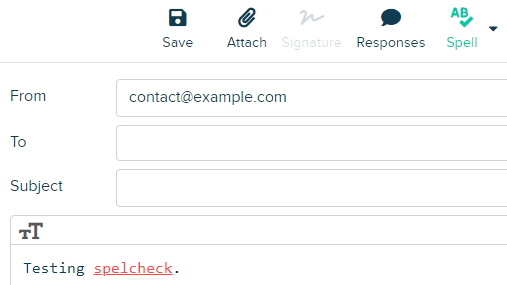
Spell Checking emails
When composing an email, you can run a Spell Check to ensure nothing is misspelled.

- Click ‘Compose’ in the left pane.
- Type the body of your email.
- Click the Spell button in the top menu.
- Any misspelled words display in red text.
Message Threads
By default, any email sent or received appears in your Inbox in list format. Another view option is to enable ‘Threads’. When enabled, any ongoing conversation with recipient(s) appears in its own thread in the list.

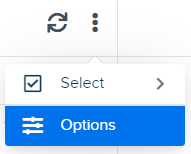
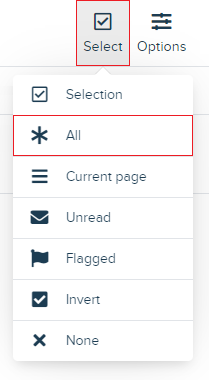
- Click ‘Mail’ in the left pane.
- Click the folder icon or three dots icon.
- From the dropdown, select ‘Options’.
- In the ‘List mode’ dropdown, select ‘Threads’.
- Click the Save button.

Any messages responded to then appear in a thread as shown below. Click the chevron (arrow) icon to display threaded messages.

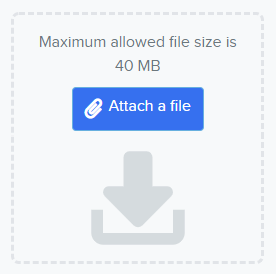
File attachments
Webmail is a PHP application and the max attachment size available is 40 MB.
- Click ‘Compose’ in the left pane.
- To the left, click the Attach a file button.
Subscribing to folder
Your email address may have several folders within it that do not appear in webmail. The following steps explain how to display these hidden folders.
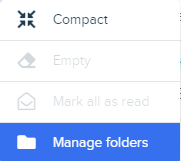
- Click ‘Mail’ in the left panel.
- Click the folder icon, or three dots icon.
- From its dropdown menu, select ‘Manage folders’.
- A series of existing folders display:
- Toggle the button to the right of any folder you wish to display.
- The folder displays when navigating back to your Inbox.

Deleting emails
Emails in the Trash folder can quickly accumulate and add to your mailbox disk quota. To quickly delete all email:
- Select the email (or emails) you wish to delete. They will be highlighted in blue.
- Click the trashcan icon to delete them.

Spam
Subscribing to the Spam folder
DreamHost purges all spam and trash email messages after 15 days. Please make sure you check your spam and trash messages within this time frame.
If you cannot view these folders, make sure you have subscribed to them as mentioned above.
Filtering emails into the Spam folder
The Spam folder used in Webmail is automatically controlled by the default anti-spam filters for all DreamHost addresses. If you find email is filtered incorrectly or not filtered, you can control this using the Allow/Block List feature in the panel.
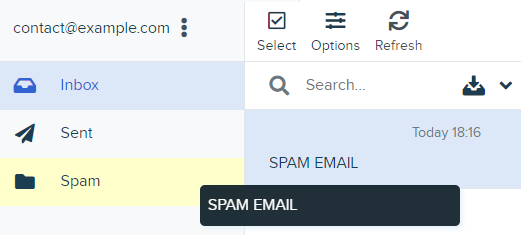
Moving spam messages to the Spam folder
If any Spam emails arrive in your Inbox, you can then drag and drop them in the Spam folder.
If you cannot view this folder, make sure you have subscribed to it as mentioned above.
Creating custom filters
Another available option is to manually create your own custom filters. This way you can control into which folder spam messages are sent.
Misc questions
Can I use an HTML signature?
Plain text emails are enabled by default, so if you have a signature that uses HTML (links, images, and/or formatting), you also need to turn on HTML for composing emails.
To enable this feature in webmail, click Settings > Preferences > Composing Messages, and then select “always” within the ‘Compose HTML messages’ drop-down menu.
Can I remove the DreamHost the logo from webmail?
Unfortunately, there is currently not a way to remove the DreamHost logo from webmail.
Can I use read receipts?
Yes. Read receipts will attempt to notify you when the recipient has opened the message you sent.
To enable this feature in webmail, click Settings > Preferences > Composing Messages, and then toggle on the ‘Always request a return receipt’ option
Keep in mind, some recipients will deliberately disable read receipts, and not all email providers and applications support the feature. As such, there is no guarantee that the feature will function, even if enabled in your mail client.
Can I use HTML to embed an image?
This is currently not possible. The only way to add an image is to create a new email.

Then click the HTML icon.

Click the image icon.
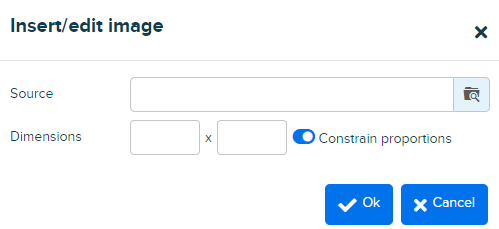
Finally, either input the URL of the image, or click the upload button to upload an image from your computer.
You can then input the link to the URL of the image.
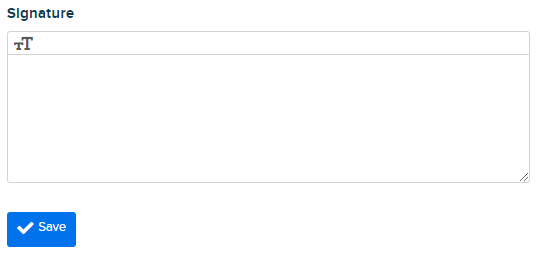
How do I create a signature?
DreamHost does not recommend using the Identities feature, as it typically does not work as expected. You need to make sure that the email address you use is the same one that you’ve logged into webmail with, as it will change the “from” setting. If you try to use a different identity when sending emails, your email will bounce and never reach the recipient.

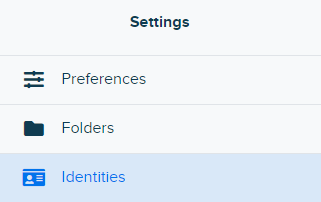
- Click ‘Settings’ in the left pane.
- From the list, choose ‘Identities’.
- From the list, click your email address.
- Add your signature in the window that opens.
- Click Save.
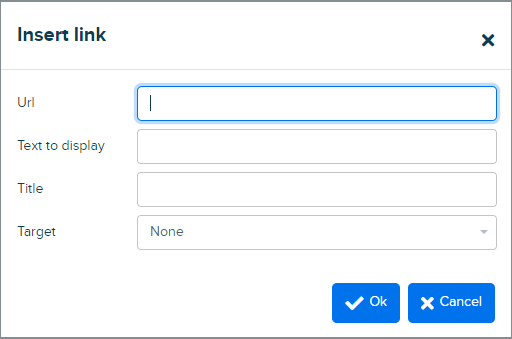
Can I use hyperlinks in a message?
Yes. Hyperlinks can be added from the ‘Compose’ page.
To add a hyperlink:
- Create a new email message.
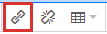
- Click the HTML icon at the top of the message window.
- Click the link icon.
- Input the URL you wish to link to, along with the text you want the link to display. When finished, click the Ok button to save your link.
Changing your timezone
Webmail defaults to the server’s timezone. You can change it to your local time if you like by following these steps:
- Log into Webmail at https://webmail.dreamhost.com.
- In the left pane, click Settings.
- Choose ‘Preferences’.
- Choose ‘User Interface’
- Select your timezone from the dropdown menu.
- Click the Save button to save your changes.